Among other mail improvements, iOS 7 does a better job of selecting the ‘from’ address when replying to an e-mail. But if you’re like me you weren’t able to take advantage of this with the way you handle your Gmail aliases. (A Gmail alias, for those who don’t know, is simply another e-mail address that funnels through your Gmail account.)
It took a lot of hunting around before I was able to figure out the correct setup. I’m writing this up to save other the effort of having to pull together all the pieces of the puzzle.
Old Setup
The way I used to have everything set up was using multiple mail accounts. One was my official Gmail account, and the others had fake incoming e-mail settings and Gmail as outgoing. This worked pretty well except for the occasional error from the Mail app about not being able to contact the incoming server.
The big issue was replying to an e-mail sent to one of my non-Gmail accounts. iOS always replied using the address associated with the inbox which was always my Gmail address. I almost never use it so every time I would have to select one of my other accounts.
New Setup
These alternate addresses are actually supported by iOS, but not through the Gmail account type. The trick is in setting it up as a regular IMAP account.
Edit 9/2016: Note for TFA Users – Before you continue, a quick note if you’re using two-factor authentication of some sort. Since these instructions don’t use the standard Gmail account type, you won’t be prompted to enter your second factor code. For situations like this, Google allows you to set up what they call an “application password”. Note this down and use the password for for ALL passwords during setup of this account.
Edit 9/2016: Note on Allowed Aliases – One other thing to note is that Gmail will actively prevent you from sending e-mail through accounts that it doesn’t know. After all, you could be sending spam. You have to add the account through Gmail Settings -> Accounts and Import -> Send mail as:. That’s outside the scope of this guide, but there are plenty of guides out there including Google’s documentation. Bottom line is if you can use the alias addresses in Gmail’s web client then you can use it for the instructions below.
Here are the steps. This works the same whether you’re using the iPhone or iPad, but I’ve included screenshots from setting it up on an iPhone.
- First go to the Settings app. Look for this icon:

- Go to Mail, Contacts, Calendars
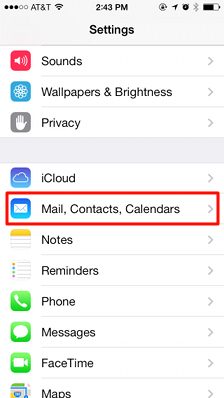
- If you already have a Gmail account added, you have two choices. The account we are going to add wont’ sync calendar or contacts so you can select only these to sync (blue box) or you can just delete the account (red box).

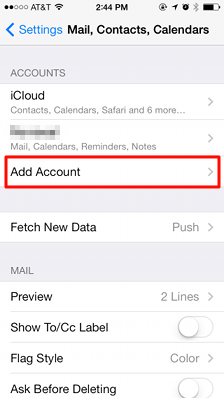
- Click Add Account.
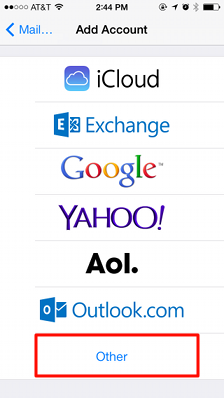
- Choose Other.
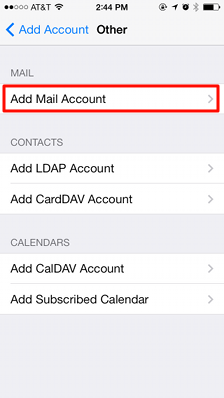
- Choose Add Mail Account.
- Enter your name, full Gmail address, password, and give the account some sort of description. When you click Next, your account will authorize with Google and then you can change more settings.
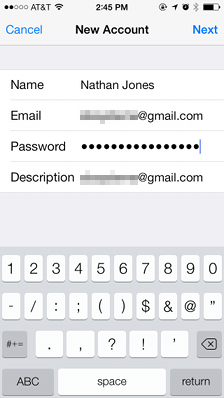
- Make the following selections.
Account Type – IMAP
Incoming Mail Server: Host Name – imap.gmail.com
Outgoing Mail Server: Host Name – smtp.gmail.com
User Names – Use your full Gmail address
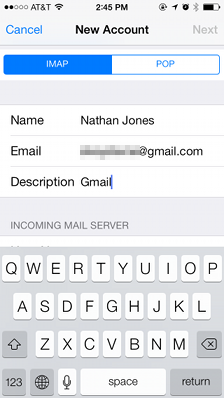
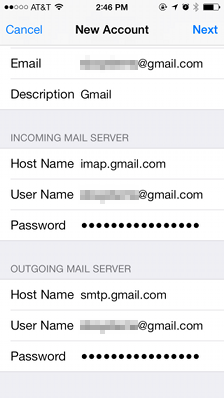
- Choose to sync Mail. (I sync Notes here as well.) Now click Save.

- Your new Gmail account is now listed among your accounts. Touch it to open it up and touch Account to access its settings.
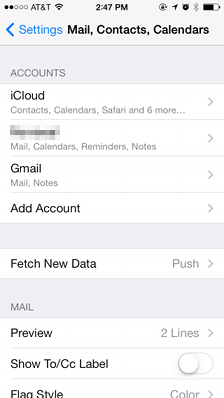
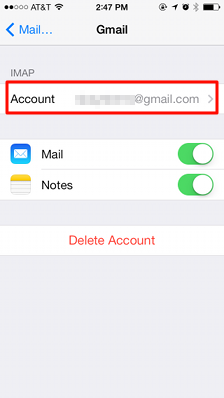
- Touch the Email field.
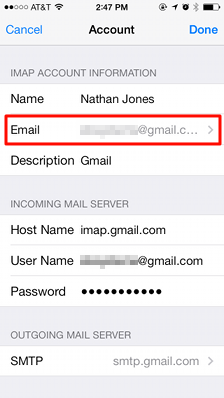
- Here’s where the magic happens! Touch Add Another Email… to add as many e-mails as you want. (Remember these have to be preauthorized by Google.)
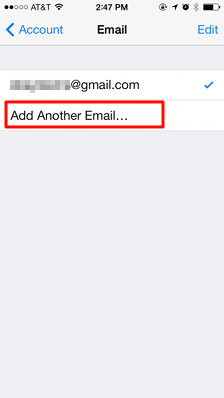
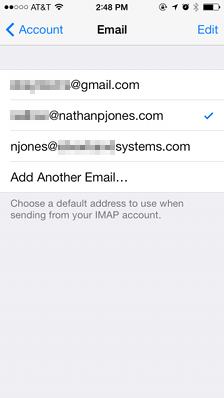
- Once you’ve added your addresses, you can choose one of them for the default, indicated by the blue check (
 ).
).
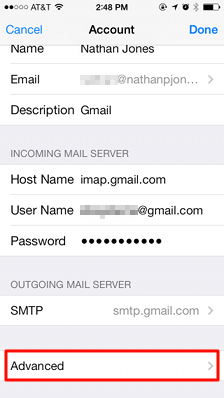
- (Optional) The last thing is to do is set mail to be archived instead of deleted. Back at the Account page, touch Advanced.
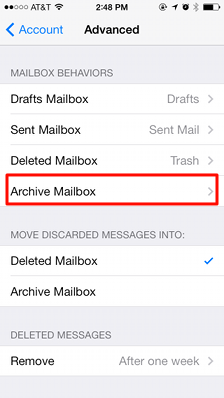
- Touch Mailbox Behaviors: Archive Mailbox.
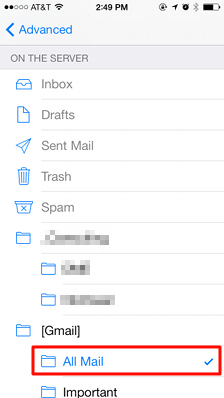
- Look for the “[Gmail]” folder and touch “All Mail”.
- Back at the Advanced screen, touch Move Discarded Messages Into: Archive Mailbox.
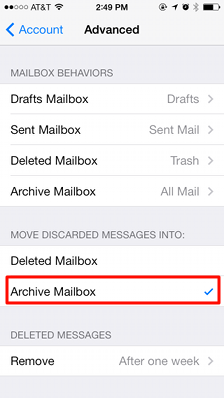
And that’s it. Your aliases will work without a problem.
Feel free to leave questions or suggestions in the comments section.


Thanks for posting this! You saved me so much time. Very grateful for the detailed steps and explanations.
I had a similar problem with my the official mail app on iphone6 using a gmail alias (I was able to receive but not to send). Using your technique I was able to send mail from my alias address, but not to receive anymore. So I found a hack.
Create two gmail accounts: one using the gmail logo (you will be able to receive) and one using the “other” button (you will be able to send). Then in your gmail account you created using the gmail logo, specify a fallback smtp server, the one you created manually (using the “other” button). Hope it helps. Long live the interwebs
Brilliant @Nathan and thanks also to @James and @sv for providing the missing parts of the jigsaw. I now have two Gmail accounts on my new iPad – one for Mail & Notes and a second for Contacts & Calendar. I can now send and receive e-mail via the built-in Mail app on the iPad and sent mail arrives with the ‘from:’ address as joe@bloggs.net rather than jbloggs123@gmail.com – one happy bunny! 🙂
All that’s needed now is a solution to the lack of Push mail! 😉
Thank you so much ! I finally resolved my pbm, you’re a genius ! 🙂
Do you know how to do this using Mail for Yosemite? Thanks to these directions I can use my alias on my ipad and iphone but not my mac. Thanks in advance for any help.
@Bryce I’ve actually been using an app called Unibox on Yosemite. I’ve found it overall much easier and more pleasant to use than the standard Mail app. It also supports email aliases and makes it very easy to configure them.
Thank you for providing this great information. I followed your steps and now I am able to send out emails via my alias. However, I needed to insert my username and password in order to send out email via google.
Thanks you soooooooooooooo much for this. Spent hours and hours trying to work out how to do this and failed miserably. Decided to try again another day (today) and came across your post, which works LIKE A CHARM.
Brilliant!
Hi Nathan,
I followed the steps and the priciple is clear to me.
We are running corp account on google apps for business on a different domain.
Unfortunatly the approach does not work for me – when sending the corp domain still appears though i set a separate mail account for it.
Kind regards, Lars
Thank you! Just one question. When I’m replying to a message sent to one of my aliases, I’m still replying with my @gmail by default, rather than my alias which this message was sent to. Is there any tip for that?
You have no idea how much this helped me out. After an epic blonde moment when setting up my gmail account I needed to use an alias rather than migrating (perhaps I am too lazy). This was so straight forward and helpful. Thank you!
@Bryce – this is direct from support.apple.com. it works just fine.
Mail (Yosemite): Use email aliases (you can search this in support.apple.com if you like)
Use email aliases in Mail
Email aliases are like nicknames for your real email address; they mask your real address and help keep it private. When you send messages using an alias, your recipients see the alias instead of your real email address. For example, Emily Harrold could send messages from the alias webmaster@example.org, instead of eharrold@example.org.
Create or change an alias
Choose Mail > Preferences, then click Accounts.
Select an account, then click Account Information.
Do one of the following:
For an iCloud account: Click the Alias pop-up menu, then choose Edit Aliases to create the aliases in iCloud. For more information, see the iCloud Help.
For other accounts: In the Email Address field, enter the aliases, separated by commas (for example, webmaster@example.org, sales@example.org, support@example2.org).
Send a message from an alias
In the New Message window, move the pointer over the From field, click the pop-up menu that appears, then choose an email alias.
Nice blog! Thank you for posting it. We are also deal in same field
You did a very good job of putting this together — thanks for the generosity with your time. I had to set up 3 new iPhones today and this helped me speed through it.
It’s really annoying that the Mail app doesn’t allow multiple email addresses for “Google” accounts. Note that the official Gmail app from Google does allow you to send from multiple email addresses.
Thanks again!
Very helpful. Thank you.
Thank you!!! Perfect instructions for an easy solve that I never would have figured out myself!!
Oh you saved my life! 😀 Especially my time! Thanx a lot!
Excellent tutorial, well written and accurate. Thanks very much for sharing you knowledge.
Thank you!
You saved me a lot of effort!
Hi Guys,
I have been looking for a solution to add my gmail alias too. However, I am getting stuck at the step 12 above. When I ‘Add Account’ the filed shows a grey ‘x’ and doesn’t save. I have tried using several addresses but this ‘x’ doesn’t disappear.
Any idea what the issue might be?
Thanks Heaps!
Hey Nathan
I’ve tried applying this to paul@hdegr.ee, an alias on paul@hdegreeglobal.com but apparently the server rejects the alias address. Any clue?
Has anyone figured out a way to have the signature change based upon which “From” address is chosen?
I see the same problam like Scott.
How to create different signature to different alias?
I’ve been searching for a way to do this. This article needs to be in lights somewhere!
Thank You Nathan!
@SP
“However, I am getting stuck at the step 12 above. When I ‘Add Account’ the filed shows a grey ‘x’ and doesn’t save. I have tried using several addresses but this ‘x’ doesn’t disappear.”
I had the same problem. The solution is very simple: after adding the new address, simply click on ‘return’. That worked for me.
Really great info! I had to activate “Less secure apps” in gmail settings because iphone says “username or password incorrect” and gmail was blocking the connection.
Thanks!
I had the same problem as Juan: gmail was blocking the connection, and I got an email from gmail saying I needed to activate “less secure apps.” I did that and tried again, but I’m still unable to send or receive email from my phone using the new account. (New mail doesn’t arrive, and for email that came in while I was making the changes, I can see the email and header info, but the messages themselves don’t load.) After waiting awhile to see if those changes just took time to propagate, I got an error message on the phone saying there was a problem with the imap settings and to be sure they were correct. I’ve now triple-checked them. Can’t figure out what is wrong.
Does it work with ios 8?
Nathan, you beauty! Thanks very much. I was pulling my hair out trying to merge various .gmail addresses and a .gmx one together. Your steps worked perfectly.
For my .gmx email alias, I added the .gmx smtp settings too (under “Other SMTP Servers”). This prevents the “on behalf of” irritation when sending to an Exchange/Outlook recipient. Alas, the “on behalf of” is unavoidable when sending from a gmail alias to an Exchange/Outlook recipient.
Thanks very much for taking the time to write this blog.
Thank you , this is worked fine on iOS 8.3
Thanks man!
I was trying to find a solution for this for ages! Solved my problem finally!
I used this IMAP method years ago on early iOS 3GS first gen iPod Touch. Had no issues then. Now IMAP gives ALIASES but there are no SYNC restrictions, so downloads all mail off the server. Workaround is to limit IMAP in gmail settings on the server-side. This is messy for me, so will go back to 1 Google account for mail, cal, and contacts and separate accounts for other email addresses, Eg Outlook.com etc.
Anyway figured a workaround to the bulk email download?
I’m trying to make this work but having similar “Less secure apps” messages. I switched both gmail accounts to “turn on” less secure apps but still no luck. Any advice?
Grazie mille! Sei un grande!
You just saved my life!!! Thank you so much. I have 8 emails and it has always annoyed me that I wasn’t able to reply using the same address. For a while I used the gmail app which did this easily but wasn’t as responsive or integrated as the iOS Mail app. This is wonderful!!!
awesome – anyone got a lead on a service or app to get multiple signatures to match the aliases?
This was super helpful. Thanks so much!!
Thanks I’ve been looking for this answer for months. Now booked this page for future reference… 🙂
Thank you soo much!
thanks a ton!
Thank you so much for this help!! Truly appreciated and worked great!
Thank you so much! Really detailed and helpful.
How do you resolve the problem where different email addresses require different SMTP servers?
I have two gmail accounts, let’s call them fred@gmail.com and barney@gmail.com. If I create my fred@gmail.com account and then add the barney@gmail.com address as shown above, I still can’t send mail as barney. When I try to send a message as barney, it looks right, but the recipient sees the message as coming from fred (with the added message header X-Google-Original-From: barney@gmail.com)
I think what is happening is that the mail app is trying to send the message with barney@gmail.com but using fred’s login for the smtp server. The login succeeds but the from address does not match the account’s address, so Google changes it.
Even if I create another SMTP server with barney’s credentials, I can’t force the Mail app to use that SMTP server when sending mail as barney.
So I think this system only works if you can send all your multiple email addresses through the same SMTP server, and that server does not care about the sender’s address.
I couldn’t connect with SSL until I switched on 2-step verification on Google… using an app specific password did the trick.
Many thanks for this – now I don’t need to constantly change the from address every time i reply to someone.
It appears this may no longer work with IOS9. I have enabled IMAP for my gmail account and whenever I try to create an account in iPhone using “other” it says unable to verify username or password. I am certain I am using the correct password and two step verification is disabled.
Works great on iOS 9 here. Gmail account but external alias as the ‘front’ email I want people to know and use. I have it configured to use its own SMTP server in gmail account settings and as an addition to this, to really hide your gmail when you send it, add the alias’ own smtp server as an smtp server in the Mail settings and disable gmail’s one. So only have the alias email smtp server enabled, then in the source of the outgoing emails it will appear 100% as if it came from that email even though you’re replying from the gmail account and don’t use an incoming server for the alias email!
wicked!
THANK YOU. Thank you, thank you, thank you.
@Brian: I was experiencing the same issue in iOS 9.1 with 2-step verification disabled. I’m a Google Apps user, so I was able to get help from their phone support. They had me:
1) Enable less secure apps for my domain:
https://support.google.com/a/answer/6260879
2: Enable less secure apps for my specific account:
https://support.google.com/accounts/answer/6010255
This resolved the issue for me. If you’re a standard Gmail user you’d only need to do the latter step.
I had already tried step 2 per the Gmail Help on how to troubleshoot sign-in problems:
https://support.google.com/mail/answer/14257
The gotcha in my case was that I had missed the domain-level setting.
For iOS 9, you don’t need to do any special settings. Here is the latest instruction, from the Google help webpage:
This information is for the official Gmail app for iPhone, iPad, and iPod touch.
If you have multiple accounts, you can compose messages in Gmail and have them appear to be sent from your other email account. If you already use a custom From address in Gmail, you don’t have to do any extra set up on your iPhone or iPad.
Open the Gmail app.
Touch Compose button.
Touch your email in the From line and choose one of your addresses. [It may take a couple of tries to get it to display properly.]
If you don’t see “From” while composing, you need to change your Gmail settings on a computer so you can send mail as that address:
Open Gmail on a computer.
Follow the directions to send mail as another address.
AWESOME!!! knew it was hidden somewhere…. worked on outlook couldn’t get it on iphone!!