

Among other mail improvements, iOS 7 does a better job of selecting the ‘from’ address when replying to an e-mail. But if you’re like me you weren’t able to take advantage of this with the way you handle your Gmail aliases. (A Gmail alias, for those who don’t know, is simply another e-mail address that funnels through your Gmail account.)
It took a lot of hunting around before I was able to figure out the correct setup. I’m writing this up to save other the effort of having to pull together all the pieces of the puzzle.
Old Setup
The way I used to have everything set up was using multiple mail accounts. One was my official Gmail account, and the others had fake incoming e-mail settings and Gmail as outgoing. This worked pretty well except for the occasional error from the Mail app about not being able to contact the incoming server.
The big issue was replying to an e-mail sent to one of my non-Gmail accounts. iOS always replied using the address associated with the inbox which was always my Gmail address. I almost never use it so every time I would have to select one of my other accounts.
New Setup
These alternate addresses are actually supported by iOS, but not through the Gmail account type. The trick is in setting it up as a regular IMAP account.
Edit 9/2016: Note for TFA Users – Before you continue, a quick note if you’re using two-factor authentication of some sort. Since these instructions don’t use the standard Gmail account type, you won’t be prompted to enter your second factor code. For situations like this, Google allows you to set up what they call an “application password”. Note this down and use the password for for ALL passwords during setup of this account.
Edit 9/2016: Note on Allowed Aliases – One other thing to note is that Gmail will actively prevent you from sending e-mail through accounts that it doesn’t know. After all, you could be sending spam. You have to add the account through Gmail Settings -> Accounts and Import -> Send mail as:. That’s outside the scope of this guide, but there are plenty of guides out there including Google’s documentation. Bottom line is if you can use the alias addresses in Gmail’s web client then you can use it for the instructions below.
Here are the steps. This works the same whether you’re using the iPhone or iPad, but I’ve included screenshots from setting it up on an iPhone.
- First go to the Settings app. Look for this icon:

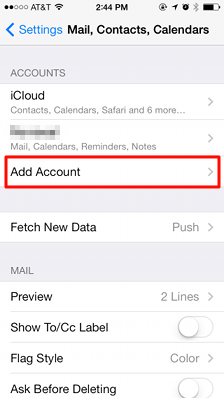
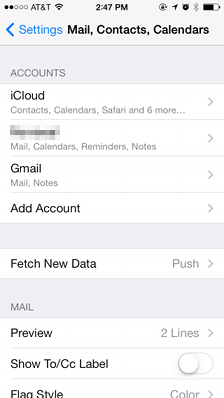
- Go to Mail, Contacts, Calendars

- If you already have a Gmail account added, you have two choices. The account we are going to add wont’ sync calendar or contacts so you can select only these to sync (blue box) or you can just delete the account (red box).

- Click Add Account.
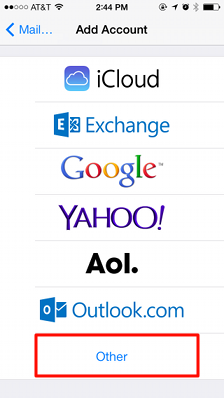
- Choose Other.
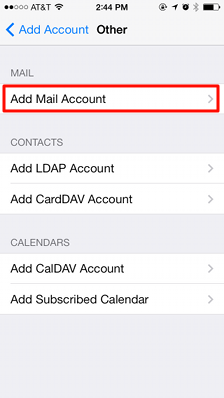
- Choose Add Mail Account.
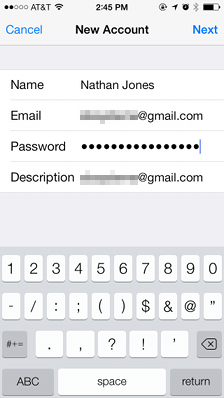
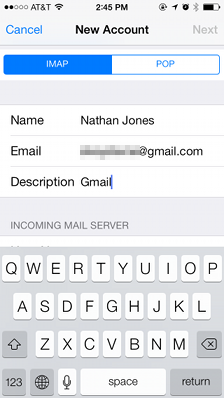
- Enter your name, full Gmail address, password, and give the account some sort of description. When you click Next, your account will authorize with Google and then you can change more settings.
- Make the following selections.
Account Type – IMAP
Incoming Mail Server: Host Name – imap.gmail.com
Outgoing Mail Server: Host Name – smtp.gmail.com
User Names – Use your full Gmail address

- Choose to sync Mail. (I sync Notes here as well.) Now click Save.

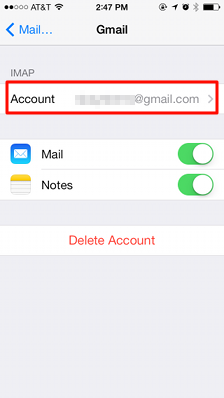
- Your new Gmail account is now listed among your accounts. Touch it to open it up and touch Account to access its settings.
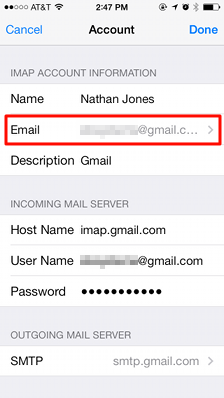
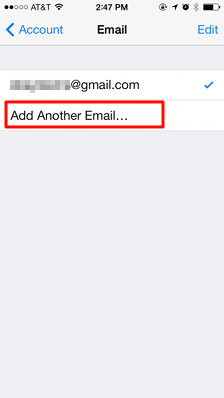
- Touch the Email field.
- Here’s where the magic happens! Touch Add Another Email… to add as many e-mails as you want. (Remember these have to be preauthorized by Google.)
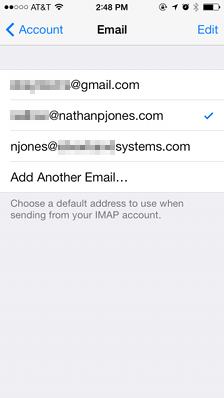
- Once you’ve added your addresses, you can choose one of them for the default, indicated by the blue check (
 ).
).
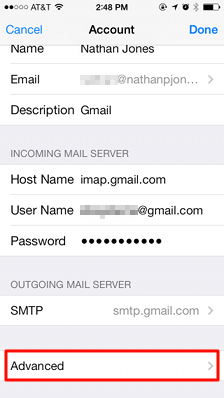
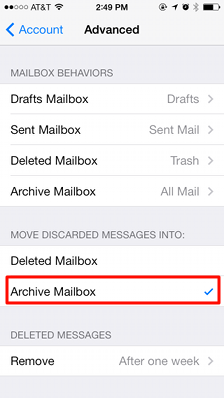
- (Optional) The last thing is to do is set mail to be archived instead of deleted. Back at the Account page, touch Advanced.
- Touch Mailbox Behaviors: Archive Mailbox.
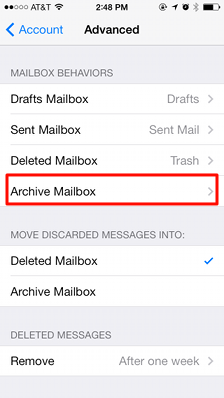
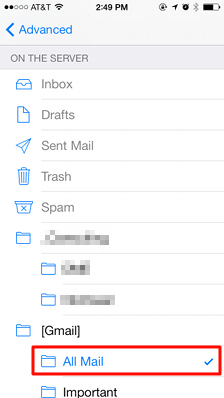
- Look for the “[Gmail]” folder and touch “All Mail”.
- Back at the Advanced screen, touch Move Discarded Messages Into: Archive Mailbox.
And that’s it. Your aliases will work without a problem.
Feel free to leave questions or suggestions in the comments section.
Thanks so much for posting this.
Currently in the process of switching over to google apps for work and couldn’t find any of this information for the last day or so until I stumbled on your article.
You are a life saver!!!
Thankyou so much
Allen
I spoke to soon!
managed to get all the settings done as described with the 3 email accounts listed for the user – everything appears to be ok but when sending the mail just vanishes – not in the sent items, doesnt appear on their computer and doesnt reach the destination!
Wondered if you had experience that at all?
We aren’t using the standard gmail email but rather company email through google apps – any thoughts or advice appreaciated.
Allen
Aliases are intended for when you have multiple accounts that use the same send and receive servers and credentials. Additionally, you have to verify any non Gmail accounts that you want to send from through their service under Settings–>Accounts–>Send mail as.
Sounds like your work account is a completely separate account and should be set up that way.
Nice! I actually figured this out before finding your blog, but I had a heck of a time figuring this out – hats off to you for the share, friend!
This is one of the best kept ios7 secrets around.
Worked great, thanks!
All goes fine until I get to the step 12 – when I select “Add Another E-mail” and type the e-mail, it does not get saved. I can only delete it with an “x” or go back to the previous page (and when I return, the second e-mail is gone…). Is this some bug and why only me? Also using IOS7 on Iphone 5S.
The email was set up in Google and it has a .edu extension. Tried setting it up using your solution but don’t know correct incoming and outgoing mail server. Tried imap.gmail.com and smtp.gmail.com which don’t work. Also tried with .edu extension and that doesn’t work. Any suggestions?
I have Google Apps for email for the push option but it seems one must choose between having Push email and being able to use “send as” aliases. Do you know how how to get push (via exchange) AND use of aliases that are set as as “send mail as” in Google Apps Gmail?
This was very helpful so thank you for posting this. Just wondering if you have found a solution that also gives you push. Using the “Other” email setup as outlined here eliminates push notifications for that account. Is there a way to get push notifications AND use of aliases?
Thanks a lot for posting Nathan, works like a charm!!
How do you remove the “*****@gmail.com on behalf of ….” ??
Thanks for the share. I use Google Apps and tried to set up the alias on an iPad. I was able to do so but sending the mail still sends from the primary account instead of the alias. I actually wanted people to receive from the alias. I also have two step verification enabled so I need to generate app specific passwords. Any ideas?
Thanks for the tip- it worked perfectly! Now I’m looking to sync my gmail contacts to my iPhone. Any advice?
thanks!
I’m trying this with a hotmail address where a different address is set up as the reply to address.
However if I send an email from iPhone it does not show the alternate address as the sender that I set up using your steps and also does not apply the different ‘reply to’ address.
So basically it worked to rename the account to the alternate address but the recipients still see the hotmail address… (Works fine with a computer though) Do you have an idea on how to fix this?
Thanks, Kat
WOW! What a life saver. Haha I have been struggling with this for awhile. Should’ve searched for the solution much sooner! My solution was to wait until I got to a computer to reply from my Alias, but this is PERFECT! Thanks for the solution! So great of you to share. And the screen shots make it that much easier.
Two thumbs up.
Thank you for this. I have been trying for a couple of days to do this, you’re the only one who knew what to do. It’s all up and running
Hi Nathan,
Thanks a ton for these instructions. I’ve been searching everywhere. I’m on a iphone 5S and even though I’ve followed all the instructions, when I reply to an email, the alias isn’t the default. When I compose an email though, it is. Any idea why? Thanks in advance for the help :-/
Thanks so much! I really appreciated this information — I’ve been struggling with this since we got onto Google Apps. Now, everyone can get mail from the same address whether I use my computer or phone. Thanks again!
Thank you for your tip. Do you happen to know if there is any workaround when we add an email account through ‘exchange’, instead of ‘other’? I use exchange to add my gmail account so I can get the push function, but I also want to be able to use my email alias. I have checked that using the exchange, you don’t see the option of adding email. Thanks
@HenryWijaya
I think that the predefined schemes are specifically to blame for not being able to set multiple accounts. So sorry, no, I don’t think this is possible. Unless, have you tried it?
@Neville
Apple is notorious for dictating your workflow, and unfortunately this is one of those situations. There’s no way to change the smart reply-from behavior–only the new mail as you’ve found.
@Steve
This is something Google adds on it’s way through their servers and cannot be removed. I think they do this to prevent spammers from using this feature to gain legitimacy.
The way to remove it is by having Google relay the mail through a different smtp. My alias is actually a full e-mail account that I route through gmail for the great spam filter and so as to have one unified record of all my e-mail. I just use my provider’s smtp server and credentials.
Check out this page on how to do this.
@Nathan,
So, I have been using ‘exchange’ to set up my gmail accounts. I use this setting for the original gmail account, or even my school emails that are gmail based. It works fine and I can use the ‘push’ feature using this setting. However, if I’m not mistaken, Google discontinued this ‘exchange’ after January 2013. Those who used this before can still continue using it though.
The problem is, using the ‘exchange’ setting, I cannot add alias like what you suggested in ‘other’. There is no such option. Adding the alias after “,” (comma) doesn’t work either. This is so frustrating. I hope to use the native mail app to access gmail with push function and alias. This is so easy in the Mac Mail App. How come this is so difficult in iOS? I can’t understand this.
Nathan,
First thanks a lot for your time saving and wonderful article.
I would just add one piece of info for those having trouble with the “send mail as” option to check out this link http://m.google.com/sync/settings solves some of the questions above too.
This was an awesome workaround. Thank you!
Have the same issue when I add a second email. It adds them but after saving it and going back the email address is gone.
As@uncommonN
March 18, 2014 at 3:34 pm
Thank you for this.
The other problem is that all aliases use the same name you used to set up the account so they all have to be aliases that use that name.
Thank for a beautifully presented, easy to understand solution that works perfectly!
You’re basically my hero. I must add one thing that was necessary for me to get this working. I had to switch on “SSL” under the outgoing mail server settings. Gmail needs this to work apparently. Otherwise, works like buttah.
I’ve followed this procedure and has worked for the iPad. Tried twice on my iPhone 5S and each time I can receive emails but get a sending error whenever I try to send email. Any fix for this issue? (I tried resetting my Network settings and that dis not work.)
Thanks Nathan, works well at incoming mails. I’ve run a few tests myself though with sending from alias, and unfortunately nothing going out or being received from test email. Followed your instructions completely. Anyone found the same?
@HenryWijaya
It is possible to “Send Mail As” from iphone & ipad (once you’ve added it to the user’s google apps email account and confirmed it) … see the following article (https://support.google.com/a/users/answer/138740?hl=en), and look at the very bottom where it says:
Additionally, Gmail and Google Apps users can send mail from their iOS mail app using a custom “From” address. To enable this feature, do the following:
On your iOS device, go to http://m.google.com/sync/settings.
Select your device and check Enable “Send Mail As” for this device.
I almost lost my mind before I found this… close call!
Been annoyed by this problem for a couple weeks now thanks for the post! Worked like a charm!
Just wanted to say THANK YOU! I struggled with this very issue and you walked me right through!
If you want to keep POP3, Mailbox from Dropbox works as well.
For those who can’t get it working and original address is still visible in the emails sent from an alias. Make sure in the step 7 you don’t put your email address an Name. I did that and it took me 1 day to figure out why people see my gmail address.
In response to uncommonN, who said “All goes fine until I get to the step 12 – when I select “Add Another E-mail” and type the e-mail, it does not get saved. I can only delete it with an “x” or go back to the previous page (and when I return, the second e-mail is gone…). Is this some bug and why only me? Also using IOS7 on Iphone 5S.”
The trick is that after typing your desired email alias on the blank line, you need to hit “return” on the keypad. That is how it gets saved. Totally not obvious!
Hi, it seems like this is failing to work on ios 7.1.1.
Touching the email field at step 11 lets you edit the email, does not take you into the screen shown in step 12.
Any suggestions?
Folks,
I figured out *A* fix for the reply issue. This only applies if you’re using the Gmail account for one other account and you always want mail to be sent from an alias.
For example, I’m on a Google apps domain, and prefer using the Gmail interface (and generous storage space) as opposed to our crappy 3rd party vendor email that we actually use and publish (so this is the one that I’ve entered as the alias in my Gmail settings).
So the following will work if you don’t actually want to ever email from or reply from this mail Gmail email account, just aliases. Read that last sentence again because it’s the key sacrifice.
So… The fix → When going in to add the additional aliases after the account has been created, add all the aliases desired, BUT THEN, tap *Edit* and delete the email address associated with the main Gmail account.
So now, the mail app will only be able to pull from the aliases for the reply-to field, and the one that’s been selected will be chosen by default.
I was trying to figure out why my sent mail folder was empty. So with the help of this web page: I deleted account, created new IMAP gmail account, using “>>>other<<<" fixed my problem. Thank you
This worked brilliantly for me thank you. Couple of things to note – the instructions work fine for the iPad word for word but on the iPhone, I had to manually enable SSL in the outgoing server to get it to work (it enabled automatically on the iPad). As others have said, to add the alias email address, you have to press return on the keypad in order to store it (which you don’t have to do at any other stage), then you can set it as the default.
You’re a champion, Mine had been working fine a few years ago and then just stopped and I have been trying to figure this out ever since and it did my head in! I can now rest!
Just tried it. And faced with the dreaded “imap.gmail.com incorrect user name or password” message. Gave up in the end as well because Calendars couldn’t be synced and that’s uber important to me.
Brilliant!!
Many thanks from an Android user trying to setup his wife’s iphone 🙂
@Danny and anyone else with an issue with imap error, this all worked well for me for about 2 weeks until all of a sudden got “Cannot get mail. The mail server “imap.gmail.com” is not responding “…. tried to re-add, didn’t work.
Googled extensively and looks like it has to do with 2-step verification. I hadn’t turned it on for gmail, but just did, generated a code for my iphone, and re-added as an “other” account, initially using my usual password but then using THAT generated code as the password in the imap section (it auto fills the initial password you did on the page before, and smtp section kept old password, didn’t seem to matter). Now it works, alias is available to respond from, and no more errors!
Same type of problem but on android. Same solution?
Pingback: iPhone 5 Woes – BikingBrian
My coworker filters her email through gmail due to so much spam we get. now she wants to set it up on her new iphone and be able to reply from our work account. I tried this, and it gives the option to send from, but when the person receives it it says gmail not the work account. What are we doing wrong?
ios8 update pls
You can also automatically use your aliases through the iPhone gmail app with no additional setup. Select the From field to change the alias. The Gmail app has the additional advantage of viewing folders more easily.